Importing Networks into Cytoscape
Setting up
In this notebook we will explore how to use Cytoscape’s cyREST API to programmatically import, layout and style networks from CATMAID into Cytoscape.
What you need:
Cytoscape (> 3.5.0) with activated cyREST API (I think this is the default). In OSX: make sure to allow Cytoscape to make connections via http if prompted!
-
pip3 install py2cytoscape
Further reading:
some Jupyter notebook examples: https://github.com/cytoscape/cytoscape-automation/tree/master/for-scripters/Python
this one was especially useful: https://github.com/cytoscape/cytoscape-automation/blob/master/for-scripters/Python/basic-fundamentals.ipynb
[1]:
from py2cytoscape.data.cyrest_client import CyRestClient

from IPython.display import Image

import networkx as nx
import pandas as pd

import pymaid

rm = pymaid.CatmaidInstance('server_url', 'api_token', 'http_user', 'http_password')

print('pymaid version:', pymaid.__version__)
INFO : Global CATMAID instance set. (pymaid)
pymaid version: 0.89
Danger
Make sure that Cytoscape is running before you proceed!
The hard way
The cyREST API lets you automate pretty much everything you can do by hand using the Cytoscape GUI. In order to illustrate the basic principles, we will demonstrate how to import a network from CATMAID the hard way. If you don’t care about that, feel free to skip ahead and have a look at how pymaid facilitates basic imports.
[2]:
# Fire up the cytoscape interface - this will throw an error if no connection is found (e.g. if Cytoscape is not running)
cy = CyRestClient()

# Clear running session (= delete existing networks and views)
cy.session.delete()
First, we will generate a network as NetworkX graph (see pymaid.network2nx() for more options). For illustration, we will use the connectivity between PD2a and MBON-a2sc published by Dolan et al. (2017).
[3]:
adj = pymaid.adjacency_matrix('annotation:MBON a2sc', 'annotation:PD2a1/b1')
g = pymaid.network2nx(adj)
INFO  : Found 2 skeletons with matching annotation(s) (pymaid)
INFO  : Found 7 skeletons with matching annotation(s) (pymaid)
INFO  : Retrieving and filtering connectivity... (pymaid)
INFO  : Finished! (pymaid)
If you want, you can now manipulate the Graph before uploading: e.g. deleted edges, add metadata
[4]:
# By default, nodes use their skeleton ID as unique identifier and have their neuron name attached as custom attribute
print('Example node:', g.node['346114'] )

# Edges only have a 'weight' attribute
print('Example edge:', g.edges['346114', '2205218'])
Example node: {'neuron_name': 346114}
Example edge: {'weight': 18.0}
For now, let’s just go with what we have. Just keep in mind that all metadata will be imported into Cytoscape and can be used to style the graph.
To understand what’s happening, I recommend running below commands one-by-one while watching the cytoscape window.
[5]:
# This generates the network in Cytoscape
n = cy.network.create_from_networkx(g)
[6]:
# We can get an image from the current layout and show in this notebook:
Image(n.get_png(height=400))
[6]:
Because we haven’t applied any layout yet, all neurons sit on top of each other. Let’s fix that:
[7]:
# Get a list of available layouts:
cy.layout.get_all()
[7]:
['attribute-circle',
 'stacked-node-layout',
 'degree-circle',
 'circular',
 'attributes-layout',
 'kamada-kawai',
 'force-directed',
 'cose',
 'grid',
 'hierarchical',
 'fruchterman-rheingold',
 'isom',
 'force-directed-cl']
[8]:
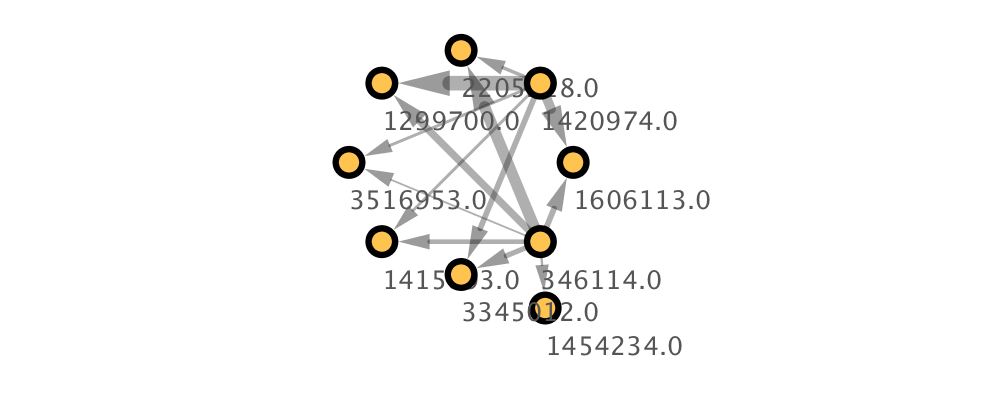
# Apply a layout
cy.layout.apply(name='circular', network=n)

# Plot again
Image(n.get_png(height=400))
[8]:

Next, let’s generate a custom style and apply it to our network.
[9]:
# This will either retrieve the style "my_style" or generate one if it doesn't already exists
#  You can get a list of available styles using cy.style.get_all()
s = cy.style.create('my_style')
[10]:
# To get a list of available parameters:
pd.Series(cy.style.vps.get_all())
[10]:
COMPOUND_NODE_PADDING                                   Padding (Compound Node)
COMPOUND_NODE_SHAPE                                       Shape (Compound Node)
DING_RENDERING_ENGINE_ROOT            Ding Rndering Engine Root Visual Property
EDGE                                                       Edge Visual Property
EDGE_BEND                                                             Edge Bend
EDGE_CURVED                                                         Edge Curved
EDGE_LABEL                                                           Edge Label
EDGE_LABEL_COLOR                                               Edge Label Color
EDGE_LABEL_FONT_FACE                                       Edge Label Font Face
EDGE_LABEL_FONT_SIZE                                       Edge Label Font Size
EDGE_LABEL_TRANSPARENCY                                 Edge Label Transparency
EDGE_LABEL_WIDTH                                               Edge Label Width
EDGE_LINE_TYPE                                                   Edge Line Type
EDGE_PAINT                                                           Edge Paint
EDGE_SELECTED                                                     Edge Selected
EDGE_SELECTED_PAINT                                       Edge Color (Selected)
EDGE_SOURCE_ARROW_SELECTED_PAINT               Edge Source Arrow Selected Paint
EDGE_SOURCE_ARROW_SHAPE                                 Edge Source Arrow Shape
EDGE_SOURCE_ARROW_UNSELECTED_PAINT           Edge Source Arrow Unselected Paint
EDGE_STROKE_SELECTED_PAINT                         Edge Stroke Color (Selected)
EDGE_STROKE_UNSELECTED_PAINT                     Edge Stroke Color (Unselected)
EDGE_TARGET_ARROW_SELECTED_PAINT               Edge Target Arrow Selected Paint
EDGE_TARGET_ARROW_SHAPE                                 Edge Target Arrow Shape
EDGE_TARGET_ARROW_UNSELECTED_PAINT           Edge Target Arrow Unselected Paint
EDGE_TOOLTIP                                                       Edge Tooltip
EDGE_TRANSPARENCY                                             Edge Transparency
EDGE_UNSELECTED_PAINT                                   Edge Color (Unselected)
EDGE_VISIBLE                                                       Edge Visible
EDGE_WIDTH                                                           Edge Width
NETWORK                                                 Network Visual Property
                                                        ...
NODE_CUSTOMPAINT_3                                          Node Custom Paint 3
NODE_CUSTOMPAINT_4                                          Node Custom Paint 4
NODE_CUSTOMPAINT_5                                          Node Custom Paint 5
NODE_CUSTOMPAINT_6                                          Node Custom Paint 6
NODE_CUSTOMPAINT_7                                          Node Custom Paint 7
NODE_CUSTOMPAINT_8                                          Node Custom Paint 8
NODE_CUSTOMPAINT_9                                          Node Custom Paint 9
NODE_DEPTH                                                           Node Depth
NODE_FILL_COLOR                                                 Node Fill Color
NODE_HEIGHT                                                         Node Height
NODE_LABEL                                                           Node Label
NODE_LABEL_COLOR                                               Node Label Color
NODE_LABEL_FONT_FACE                                       Node Label Font Face
NODE_LABEL_FONT_SIZE                                       Node Label Font Size
NODE_LABEL_POSITION                                         Node Label Position
NODE_LABEL_TRANSPARENCY                                 Node Label Transparency
NODE_LABEL_WIDTH                                               Node Label Width
NODE_NESTED_NETWORK_IMAGE_VISIBLE                  Nested Network Image Visible
NODE_PAINT                                                           Node Paint
NODE_SELECTED                                                     Node Selected
NODE_SELECTED_PAINT                                         Node Selected Paint
NODE_SHAPE                                                           Node Shape
NODE_SIZE                                                             Node Size
NODE_TOOLTIP                                                       Node Tooltip
NODE_TRANSPARENCY                                             Node Transparency
NODE_VISIBLE                                                       Node Visible
NODE_WIDTH                                                           Node Width
NODE_X_LOCATION                                                 Node X Location
NODE_Y_LOCATION                                                 Node Y Location
NODE_Z_LOCATION                                                 Node Z Location
Length: 106, dtype: object
[11]:
# Define our own settings
custom_settings = dict(

        NODE_FILL_COLOR= '#FEC44F',
        NODE_SIZE= 18,
        NODE_BORDER_WIDTH= 7,
        NODE_BORDER_COLOR= '#999999',
        NODE_LABEL_COLOR= '#555555',
        NODE_LABEL_FONT_SIZE= 14,
        NODE_LABEL_POSITION= 'S,NW,c,0.00,3.00',

        EDGE_WIDTH= 2,
        EDGE_TRANSPARENCY= 100,
        EDGE_UNSELECTED_PAINT= '#CCCCCC',
        EDGE_STROKE_UNSELECTED_PAINT= '#333333',
        EDGE_TARGET_ARROW_SHAPE= 'DELTA',

        NETWORK_BACKGROUND_PAINT= '#FFFFFF',
    )

# Apply settings to our style
s.update_defaults(custom_settings)
Next, we need to set up some mappings for our style:
[12]:
# Set the label to use the "neuron_name" column:
s.create_passthrough_mapping(column='neuron_name', vp='NODE_LABEL', col_type='String')

# Make edge width use the "weight" column and have it scale with 1/3 of the number of synapses
max_edge_weight = n.get_edge_column('weight').max()
s.create_continuous_mapping(column='weight', vp='EDGE_WIDTH', col_type='Double',
                            points=[{'equal': '1.0', 'greater': '1.0', 'lesser': '1.0', 'value': 1.0},
                                    {'equal': max_edge_weight/3, 'greater': 1.0, 'lesser': max_edge_weight/3, 'value': max_edge_weight}]
                            )
[13]:
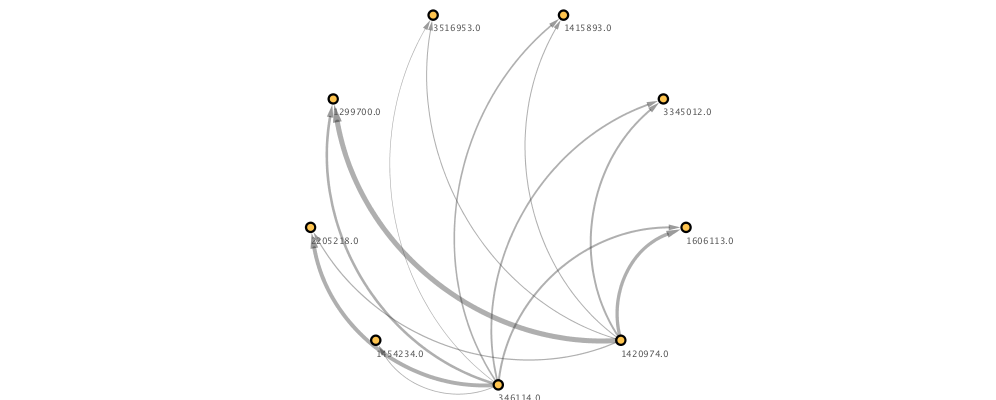
# Apply style and render again
cy.style.apply(s, n)

# Plot again
Image(n.get_png(height=400))
[13]:
To wrap up, we will demonstrate how to use pymaid to group neurons in an adjacency matrix before generating a network and pushing it to Cytoscape.
[14]:
neuron_type = {'PD2a' : pymaid.get_skids_by_annotation('PD2a1/b1'),
               'a2sc' : pymaid.get_skids_by_annotation('MBON a2sc')}
neuron_type
INFO  : Found 7 skeletons with matching annotation(s) (pymaid)
INFO  : Found 2 skeletons with matching annotation(s) (pymaid)
[14]:
{'PD2a': ['1454234',
  '2205218',
  '3345012',
  '1299700',
  '3516953',
  '1415893',
  '1606113'],
 'a2sc': ['346114', '1420974']}
Now we will group the original matrix by neuron type:
[15]:
adj_grp = pymaid.group_matrix(adj, col_groups=neuron_type, row_groups=neuron_type)
adj_grp.head()
[15]:
| col_groups | PD2a |
|---|---|
| row_groups | |
| a2sc | 110.0 |
[16]:
# Generate a NetworkX graph from the adjaceny matrix
g = pymaid.network2nx(adj_grp)
[17]:
# Let's add the number of neurons in each "compound" node
attrs = { g : { 'n_neurons' : len(v) } for g,v in neuron_type.items()}

# Add attributes
nx.set_node_attributes(g, attrs)

g.nodes['a2sc']
[17]:
{'n_neurons': 2}
[18]:
# Clear and Add network
cy.session.delete()

# This generates the network in Cytoscape
n = cy.network.create_from_networkx(g)
[19]:
# Apply a layout
cy.layout.apply(name='force-directed-cl', network=n)
[20]:
# Get our style again (remember we've deleted the session!)
s = cy.style.create('my_style')
s.update_defaults(custom_settings)

# Set the label to use the "name" column:
s.create_passthrough_mapping(column='name', vp='NODE_LABEL', col_type='String')

# Make edge width use the "weight" column and have it scale with 1/3 of the number of synapses
max_edge_weight = n.get_edge_column('weight').max()
s.create_continuous_mapping(column='weight', vp='EDGE_WIDTH', col_type='Double',
                            points=[{'equal': '1.0', 'greater': '1.0', 'lesser': '1.0', 'value': 1.0},
                                    {'equal': max_edge_weight/8, 'greater': 1.0, 'lesser': max_edge_weight/8, 'value': max_edge_weight}]
                            )

# Add node size mapping to our style
max_neurons = n.get_node_column('n_neurons').max()
min_size = 10
max_size = 30
s.create_continuous_mapping(column='n_neurons', vp='NODE_SIZE', col_type='Double',
                            points=[{'equal': min_size, 'greater': min_size, 'lesser': '1.0', 'value': 1.0},
                                    {'equal': max_size, 'greater': 1.0, 'lesser': max_size, 'value': max_neurons}]
                            )

# Apply style
cy.style.apply(s, n)
[21]:
# Plot again
Image(n.get_png(height=400))
[21]:

The easy way
Now this has been a rather extensive excursion into the usage of the cyREST API. For simple imports, pymaid has a wrapper to quickly load data into Cytoscape:
[22]:
from pymaid import cytoscape as cs

g = pymaid.network2nx(adj)

n = cs.generate_network(g, clear_session=True)

# Plot again
Image(n.get_png(height=400))
[22]:
Updating networks
Another powerful usage of the cyREST API is to have scripts running in the background to automatically update, layout or style networks. Pymaid’s pymaid.cytoscape.watch_network lets you constantly update a defined network:
In this example, we are watching a set of “seed” neurons and their direct downstream partners.
[23]:
from pymaid import cytoscape as cs

cs.watch_network('annotation:glomerulus DA1',
                 n_circles=1,   # increase to >1 for indirect partners or set to 0 for seed neurons-only
                 min_pre=5,     # 5 synapse minimum from a seed neuron to be included
                 min_post=-1,   # set threshold to -1 to exclude upstream partners
                 sleep=5,       # sleep for 5s after each update
                )
This function runs in an infinite loop. In order to interupt it, simply press CTRL-C if you are in terminal. In a Jupyter notebook, hit the stop button in the top toolbar.
Similar to the the earlier example, pymaid.cytoscape.watch_network also allows to collapse neurons into groups:
[24]:
# Same set up as above but we collapse all excitatory DA1 PNs into a single group
cs.watch_network('annotation:glomerulus DA1',
                 n_circles=1,
                 min_pre=5,
                 min_post=-1,
                 sleep=5,
                 group_by={'exc DA1': pymaid.get_skids_by_annotation('glomerulus DA1 right excitatory')}
                )